Introduction:
Write Back is like Write(Insert/Update) the data Back to database from UI. This could be useful by end users may want to update/Insert the data. This makes OBIEE a reporting tool and also as a mini application for modifying business data.
Sample demonstration with an example to perform update operation using write back:
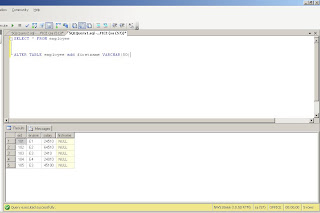
Employee table contains eid(datatype:int),ename(datatype:varchar) and salary(datatype:int) columns.

In my case I set the connection pool,office


<?xml version="1.0" encoding="utf-8" ?>
<WebMessageTables xmlns:sawm="com.siebel.analytics.web/message/v1">
<WebMessageTable lang="en-us" system="WriteBack" table="Templates">
<WebMessage name="NEW">
<XML>
<writeBack connectionPool="office"> <!-- In my case connection pool is office-->
<insert> </insert> <!-- Space should be there between opening and closing tags -->
<update>UPDATE Employee SET firstname='@{c3}' WHERE eid=@{c0}</update>
<!--(Where @{c3} and @{c0} are the column positions.)-->
</writeBack>
</XML>
</WebMessage>
</WebMessageTable>
</WebMessageTables>
Note:
Here I saved the XML file with UPDATE.xml. (Not mandatory to save the xml file in the same name, its your choice to choose the name.)


The outcome of the above changes will look as below, here column firstname will be blank and that will be used to perform write back (Here Update) operation.


Add one more column called firstname(datatype:varchar) to Employee table.

In my case I set the connection pool,office

Double click on the Employee table that will open the new window as shown below here uncheck the cacheable for Employee table.
By default cacheable will be checked here, this should be unchecked because, whenever we post any data from the dashboard to database the data will be updated in the database but this will not reflect in the dashboard since the cacheable is checked and it holds the old data.

Add the new physical column (firstname) to Employee table and get the column into Presentation layer.


Now make one XML file for Update/Insert and save in the location, C:\OracleBI\web\msgdb\customMessages
<WebMessageTables xmlns:sawm="com.siebel.analytics.web/message/v1">
<WebMessageTable lang="en-us" system="WriteBack" table="Templates">
<WebMessage name="NEW">
<XML>
<writeBack connectionPool="office"> <!--
</writeBack>
</XML>
</WebMessageTable>
</WebMessageTables>

Restart the OBI server and presentation services.
Go to Manage previlages and change WriteBack permissions for Administrator.

Open up the Answer and add the columns eid, ename, salary and firstname .
Where @{c0}=eid; @{c1}=ename; @{c2}=salary and @{c3}=firstname.
Writeback application should be applied for firstname column since this is the column we are updating currently in our example . Select Write Back option from the firstname column format as shown in below figure.

Write Back option is available only in table view, if you need to perform any write back option then it is compulsory that you should perform this in table view.
Select “Write Back properties” from Table view and enter the Template name and operation button.

The outcome of the above changes will look as below, here column firstname will be blank and that will be used to perform write back (Here Update) operation.

Now let us enter B in the below space and click on update button, this throws a strange error as below. The reason for this is Update command works only if the data already exists, here firstname is a column which does not hold any data but by default contains NULL. We need to avoid this NULL in order to remove this error.

For that fill NULL values with some value. I filled the NULL values with ‘a’.

Now we can UPDATE firstname.I updated firstname with B for the first row. Where eid=101, no error as earlier now. Also we can see that first row is updated with B and all other is not NULL but ‘a’, since we have replaced Null values with ‘a’ in the previous step.

Now if we check in the database, B is updated for the eid,101

Finally get the report into Dashboard and do required Updates and check in the data base.

